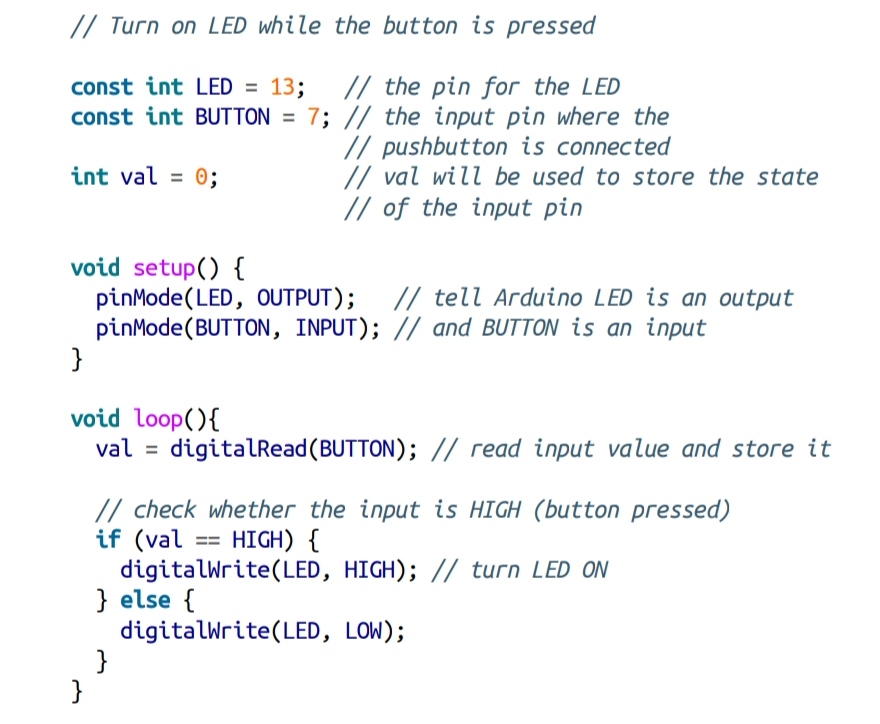
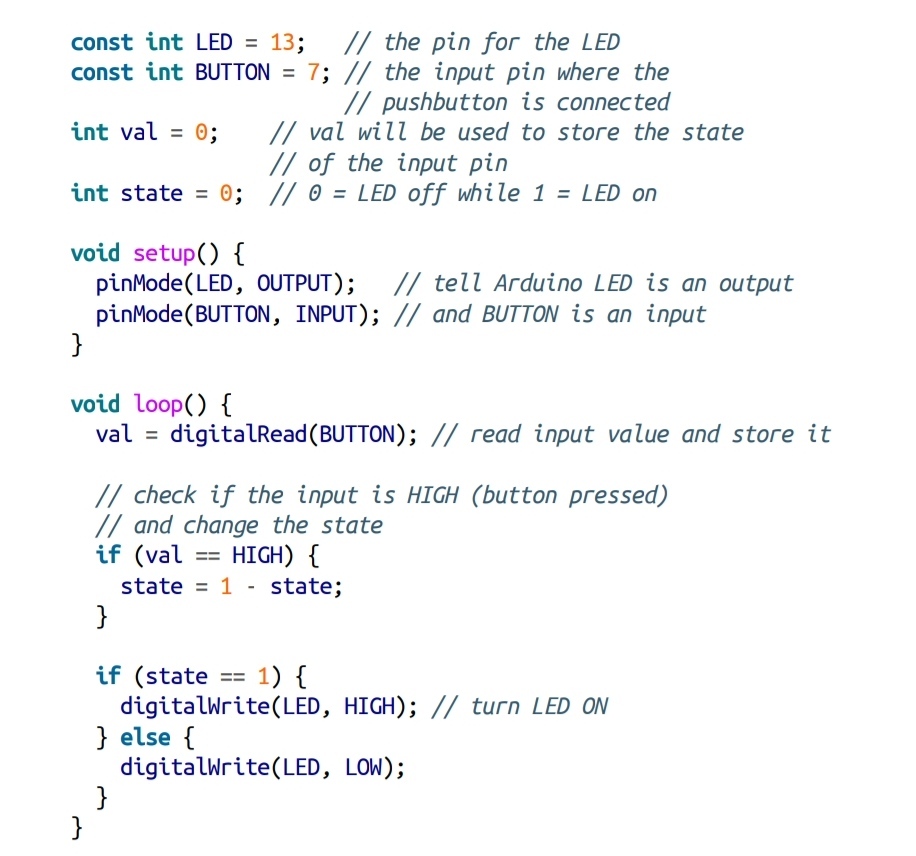
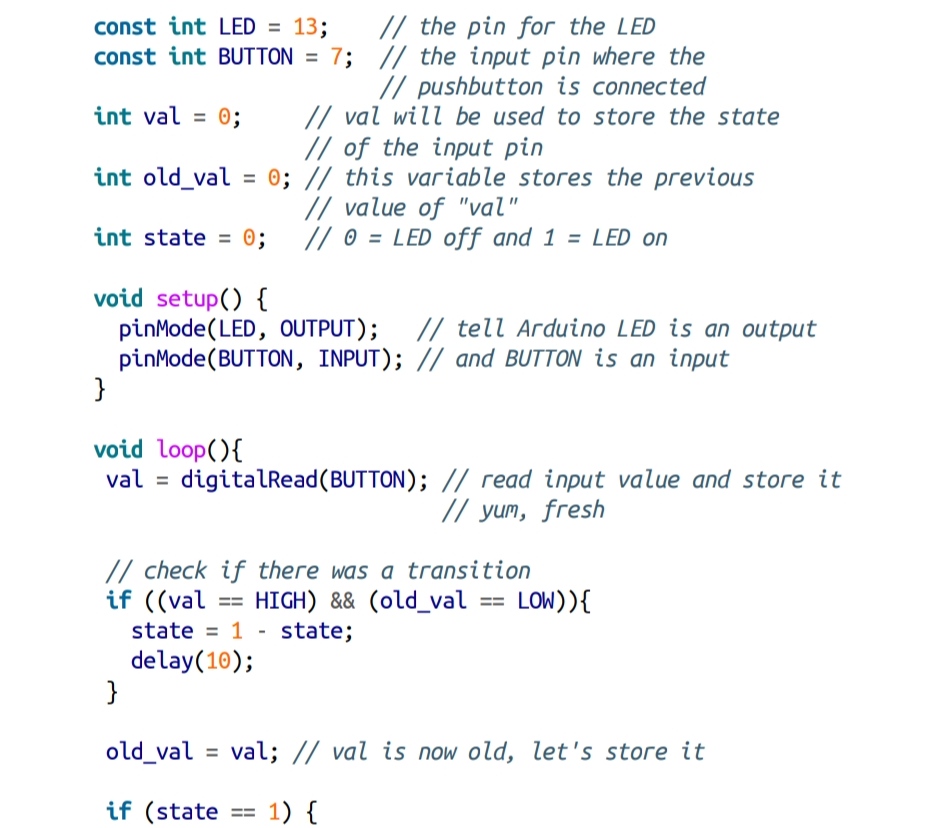
LED and button


SERIAL CONTROL BLINKING LED
/*
* SwitchCase sketch example showing switch statement by switching on chars from the serial port sending the character 1 blinks the LED once, sending 2 blinks twice sending + turns the LED on, sending – turns it off any other character prints a message to the Serial Monitor
*/
const int ledPin = 13; // the pin the LED is connected to
void setup(){
Serial.begin(9600); // Initialize serial port to send and receive at 9600 baud
pinMode(13, OUTPUT);
}
void loop(){
if ( Serial.available()) // Check to see if at least one character is available
{
char ch = Serial.read();
switch(ch){
case ‘1’:
blink();
break;
case ‘2’:
blink();
blink();
break;
case ‘+’:
digitalWrite(ledPin,HIGH);
break;
case ‘-‘:
digitalWrite(ledPin,LOW);
break;
default :
Serial.print(ch);
Serial.println(” was received but not expected”);
break;
}
}
}
void blink(){
digitalWrite(ledPin,HIGH);
delay(500);
digitalWrite(ledPin,LOW);
delay(500);
}
SERIAL CONTROL 0-9 BLINK
It makes use of ASCII characters. Converting the received ASCII characters to numeric values may not be obvious if you are not familiar with the way ASCII represents characters. The following converts the character ch to its numeric value:
blinkRate = (ch – ‘0’); // ASCII value converted to numeric value
This is done by subtracting 48, because 48 is the ASCII value of the digit 0. For example, if ch is representing the character 1, its ASCII value is 49. The expression 49- ‘0’ is thesame as 49-48. This equals 1, which is the numeric value of the character 1. In other words, the expression (ch – ‘0’) is the same as (ch – 48); this converts the ASCII value of the variable ch to a numeric value. To get a clearer idea of the relationship between the ASCII values of characters representing the digits 0 through 9 and their actual numeric values, see the ASCII table in this link.
It’s easy to receive 8-bit values (chars and bytes), because the Serial functions use 8-bit values. This sketch receives a digit (single characters 0 through 9) and blinks the LED on pin 13 at a rate proportional to the received digit value:
/*
* SerialReceive sketch
* Blink the LED at a rate proportional to the received digit value
*/
const int ledPin = 13; // pin the LED is connected to
int blinkRate=0; // blink rate stored in this variable
void setup(){
Serial.begin(9600); // Initialize serial port to send and receive at 9600 baud
pinMode(ledPin, OUTPUT); // set this pin as output
}
void loop(){
if ( Serial.available()) // Check to see if at least one character is available
{
char ch = Serial.read();
if(ch >= ‘0’ && ch <= ‘9’) // is this an ascii digit between 0 and 9?
{
blinkRate = (ch – ‘0’); // ASCII value converted to numeric value
blinkRate = blinkRate * 100; // actual blinkrate is 100 mS times received
digit
}
}
blink();
}
// blink the LED with the on and off times determined by blinkRate
void blink(){
digitalWrite(ledPin,HIGH);
delay(blinkRate); // delay depends on blinkrate value
digitalWrite(ledPin,LOW);
delay(blinkRate);
}
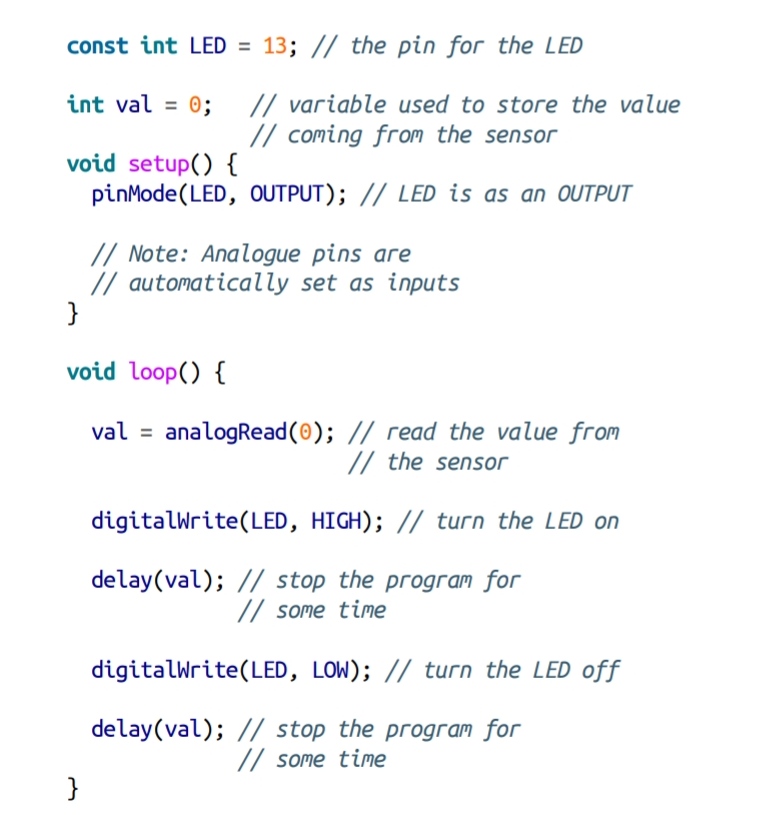
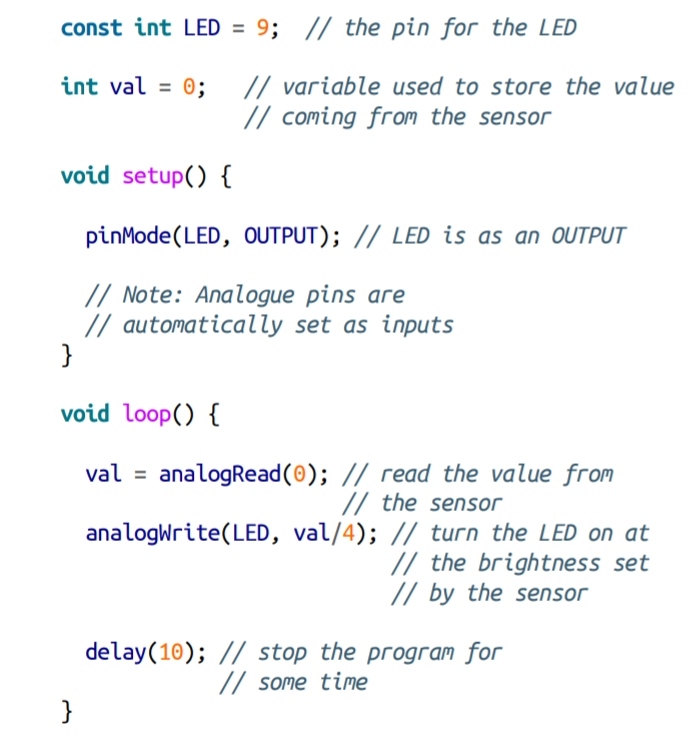
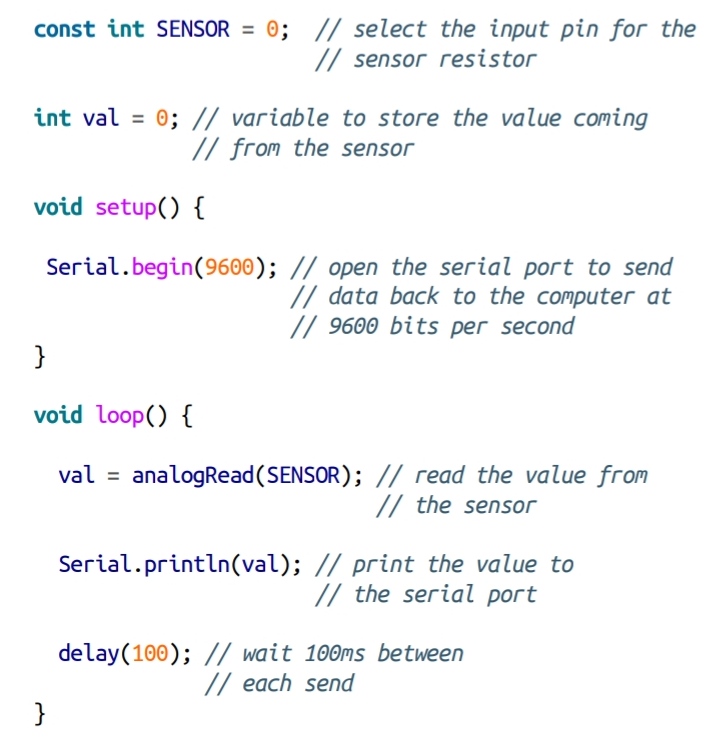
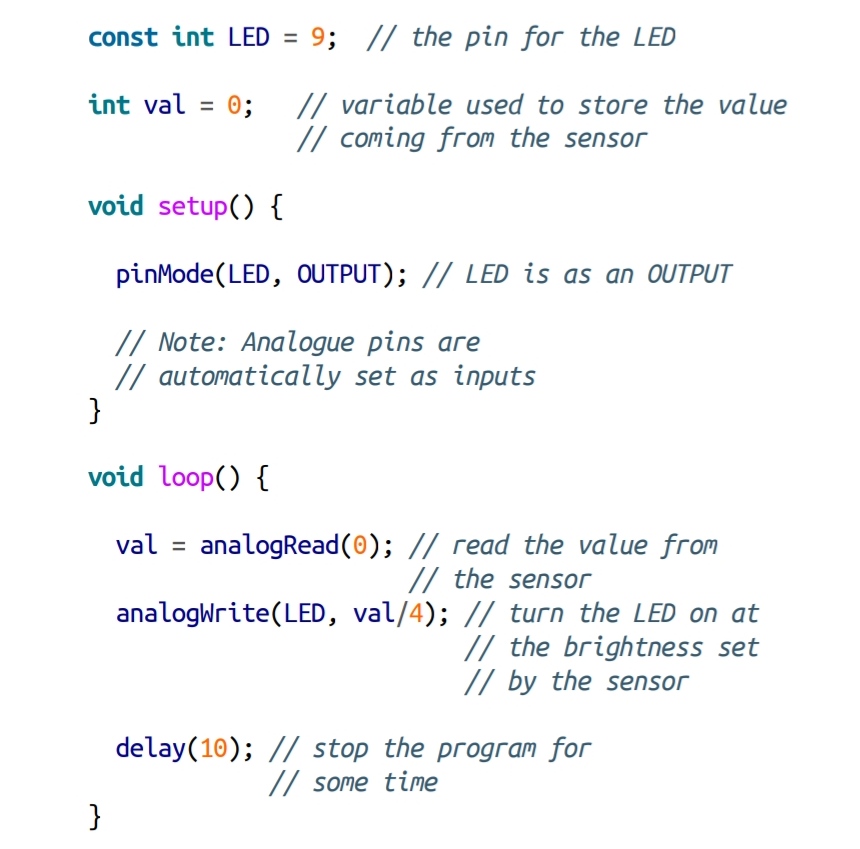
You will see code for diffetent activities using LED as analog input (Mims effect), analog output, digital input and digital output. You will also contol a RGB LED depending on light detecyed by LDR or to indicate with text to speech the LED intensity
Experiment with one LED and a Arduino and introduction to Augmented Reality with processing (presentation in Catalan language for Jornada Programa, Education Department, Government of Catalonia).
LED CUBE explosion
LED and button
Source code
int Columns[] = {1, 2, 3, 4, 5, 6, 7, 8, 9};
int Rows[] = {12, 11, 10};
int t=400;
void setup()
{
int Counter;
for (int Counter = 0; Counter < 10; Counter++){
pinMode(Columns[Counter], OUTPUT); }
for (int Counter = 0; Counter < 4; Counter++){
pinMode(Rows[Counter], OUTPUT); }
}
void loop()
{
digitalWrite(Rows[1], HIGH);
digitalWrite(Columns[4], HIGH);
delay(t);
for(int i=0;i<t;i++){
if(i%2==0){
digitalWrite(Rows[0], LOW);
digitalWrite(Rows[2], LOW);
digitalWrite(Columns[1], HIGH);
digitalWrite(Columns[3], HIGH);
digitalWrite(Columns[5], HIGH);
digitalWrite(Columns[7], HIGH);
}
else {
digitalWrite(Columns[1], LOW);
digitalWrite(Columns[3], LOW);
digitalWrite(Columns[5], LOW);
digitalWrite(Columns[7], LOW);
digitalWrite(Rows[0], HIGH);
digitalWrite(Rows[2], HIGH);
}
delay(1);
}
for(int j=0; j<t; j++){
if(j%2==0){
digitalWrite(Columns[0], LOW);
digitalWrite(Columns[2], LOW);
digitalWrite(Columns[8], LOW);
digitalWrite(Columns[6], LOW);
digitalWrite(Rows[0], HIGH);
digitalWrite(Rows[2], HIGH);
digitalWrite(Columns[1], HIGH);
digitalWrite(Columns[3], HIGH);
digitalWrite(Columns[5], HIGH);
digitalWrite(Columns[7], HIGH);
}
else {
digitalWrite(Rows[0], LOW);
digitalWrite(Rows[2], LOW);
digitalWrite(Columns[0], HIGH);
digitalWrite(Columns[2], HIGH);
digitalWrite(Columns[8], HIGH);
digitalWrite(Columns[6], HIGH);
}
delay(1);
}
digitalWrite(Rows[0], HIGH);
digitalWrite(Rows[2], HIGH);
delay(t);
for (int Counter = 0; Counter < 10; Counter++){
digitalWrite(Columns[Counter], LOW); }
for (int Counter = 0; Counter < 4; Counter++){
digitalWrite(Rows[Counter], LOW); }
}
LED INTENSITY LOOP
Processing code designed to increase and decrease the intensity of a LED continuously
Telling LED intensity
Using text to speech library to indicate percentage of lightness of LED