Students will present a project including LED starting with SOS lights code in Tinkercad (or Fritzing) using a screencast or mobile recording (screentogif) to show your workin microcontroller circuit and code.
 You need to create different versions of Arduino codes and to explain them in your personal Neocities website:
- Using simple code instructions only
- Using variables and functions without parameters
- Using functions with parameters
- Using switch function and cases
- Using arrays for delays
- Creating Morse decoder
Remember the Arduino cheatsheet
For beginners I recommend Getting started with Arduino book by Maximo Bazi (Arduino co-Foundation) and Programming Arduino. Getting started with skecthes by Simon Monk.
CODE EXAMPLE OF FUNCTIONS WITHOUT PARAMETERS.
Inside void S(){} you need to copy first code instructions started with the blink code corresponding to character S and inside void O(){} you need to write instructions corresponding to character O. Finally you need to call functions S(); O();S() inside the main loop function.
CODE EXAMPLE OF FUNCTIONS WITH PARAMETERS
void flash(int numFlashes, int d)
{
for (int i = 0; i < numFlashes; i ++)
{
digitalWrite(ledPin, HIGH);
delay(d);
digitalWrite(ledPin, LOW);
delay(d);
}
}
Inside loop main function you can call flash(3,200) for 3 times flash of 200 milliseconds (character O in Morse code) or flash (3,600) for Morse character S.
The minimum project is SOS + Student name in Morse code using lights and or sound. High scores if Arduino musical notes depends on the light level (LDR) or other ideas mixing light, LDR sensor and musical notes.

Students must insert a gif in their wordpress blogs and it must be shown the simulation of the circuit their names, the circuit and the code. The circuit can be also added as a regular image file (e.g. fritzing software) and the code as text.
SOS code with 3 functions
const byte ledPin = 13;
void setup()
// Use ledPin as output
pinMode(ledPin, OUTPUT)
//Create a function for short blink
void shortBlink()
// Make a single short blin
digitalWrite(ledPin, HIGH)
delay(200)
digitalWrite(ledPin, LOW)
delay(200)
void longBlink()
// Make a single long blink
digitalWrite(ledPin, HIGH)
delay(600)
digitalWrite(ledPin, LOW)
delay(200);
}
void morseBlink(char character) {
// Translate character to Morse code
switch(character){
case ‘s‘:
shortBlink();
shortBlink();
shortBlink();
break;
case ‘o‘:
longBlink();
longBlink();
longBlink();
break;
}
}
void loop() {
// Start blinking SOS
morseBlink(‘s‘);
morseBlink(‘o‘);
morseBlink(‘s’);
}
According to the wikipedia article on Morse Code:
A ‘dash’ should be three times the length of a ‘dot’.
The time between dots or dashes in a letter should be that same as the time for a dot.
The time between letters should be three dot times.int ledPin = 13;
const int DOT = 150;
const int DASH = DOT * 3;
int durations[] = {DOT, DOT, DOT, DASH, DASH, DASH, DOT, DOT, DOT};
void setup() {
pinMode(ledPin, OUTPUT);
}
void loop() {
for (int i = 0; i < 9; i++) {
flash(durations[i]);
if (i == 2 || i == 5)
delay(DASH – DOT); // inter-letter additional time
}
delay(1000);
}
void flash(int duration) {
digitalWrite(ledPin, HIGH);
delay(duration);
digitalWrite(ledPin, LOW);
delay(DOT);
}
//Another SOS version
int dotDur = 125;
int dashDur = dotDur * 3;
int wordPause = dotDur * 7;
void setup() { // initialize the digital pin as an output. // Pin 13 has an LED connected on most Arduino boards: pinMode(13, OUTPUT); }
void loop() {
dot(dotDur); dot(dotDur); dot(dashDur); dash(dotDur); dash(dotDur); dash(dashDur); dot(dotDur); dot(dotDur); dot(wordPause); }
void dash(int pauseDur) { digitalWrite(13, HIGH); // set the LED on delay(dashDur); digitalWrite(13, LOW); // set the LED off delay(pauseDur); }
void dot(int pauseDur) { digitalWrite(13, HIGH); // set the LED on delay(dotDur); // wait for a second digitalWrite(13, LOW); // set the LED off delay(pauseDur); }
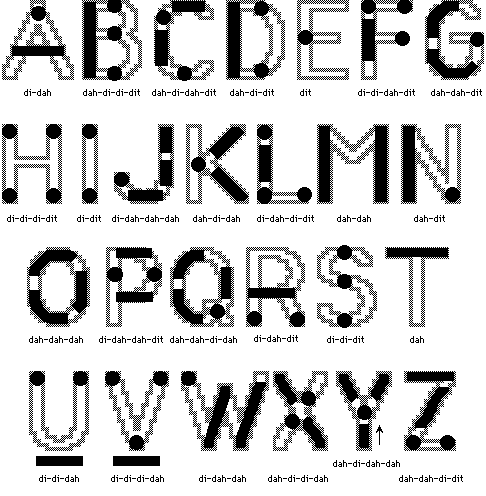
http://www.qsl.net/eb8bev/MORSE.GIF
MORSE CODE: Characters and numbers
// Morse code for blinking a LED
int ledPin = 13;
int dotDelay = 200;

char* letters[] = {
  ".-", "-...", "-.-.", "-..", ".", "..-.", "--.", "....", "..",    // A-I
  ".---", "-.-", ".-..", "--", "-.", "---", ".--.", "--.-", ".-.",  // J-R
  "...", "-", "..-", "...-", ".--", "-..-", "-.--", "--.."          // S-Z
};

char* numbers[] = {
  "-----", ".----", "..---", "...--", "....-", ".....", "-....", "--...", "---..", "----."};

void setup()
{
  pinMode(ledPin, OUTPUT);
  Serial.begin(9600);
}

void loop()
{
  char ch;
  if (Serial.available() > 0)
  {
    ch = Serial.read();
    if (ch >= 'a' && ch <= 'z')
    {
      flashSequence(letters[ch - 'a']);
    }
    else if (ch >= 'A' && ch <= 'Z')
    {
      flashSequence(letters[ch - 'A']);
    }
    else if (ch >= '0' && ch <= '9')
    {
      flashSequence(numbers[ch - '0']);
    }
    else if (ch == ' ')
    {
      delay(dotDelay * 4);  // gap between words
    }
  }
}

void flashSequence(char* sequence)
{
  int i = 0;
  while (sequence[i] != NULL)
  {
    flashDotOrDash(sequence[i]);
    i++;
  }
  delay(dotDelay * 3);    // gap between letters
}

void flashDotOrDash(char dotOrDash)
{
  digitalWrite(ledPin, HIGH);
  if (dotOrDash == '.')
  {
    delay(dotDelay);
  }
  else // must be a dash
  {
    delay(dotDelay * 3);
  }
  digitalWrite(ledPin, LOW);
  delay(dotDelay); // gap between flashes
}

Morse decode